Freva: Plugin Development

Martin Bergemann, Bijan Fallah, Andrej Fast, Mostafa Hadizadeh, Christopher Kadow, Etor E. Lucio-Eceiza, Felix Örtel, Manuel Reis, and many others…
Deutsches Klimarechenzentrum @ CLINT in Data Analysis Dpt. (+ Data Management Dpt.*)
Overview of a Freva plugin

Structure of a Plugin
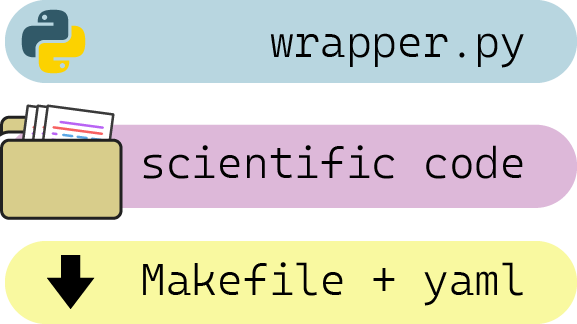
There are 3 main building blocks in a plugin:
- Wrapper: connects the tool to Freva
- Tool: scientific code
- Installer: they install the necessary libraries
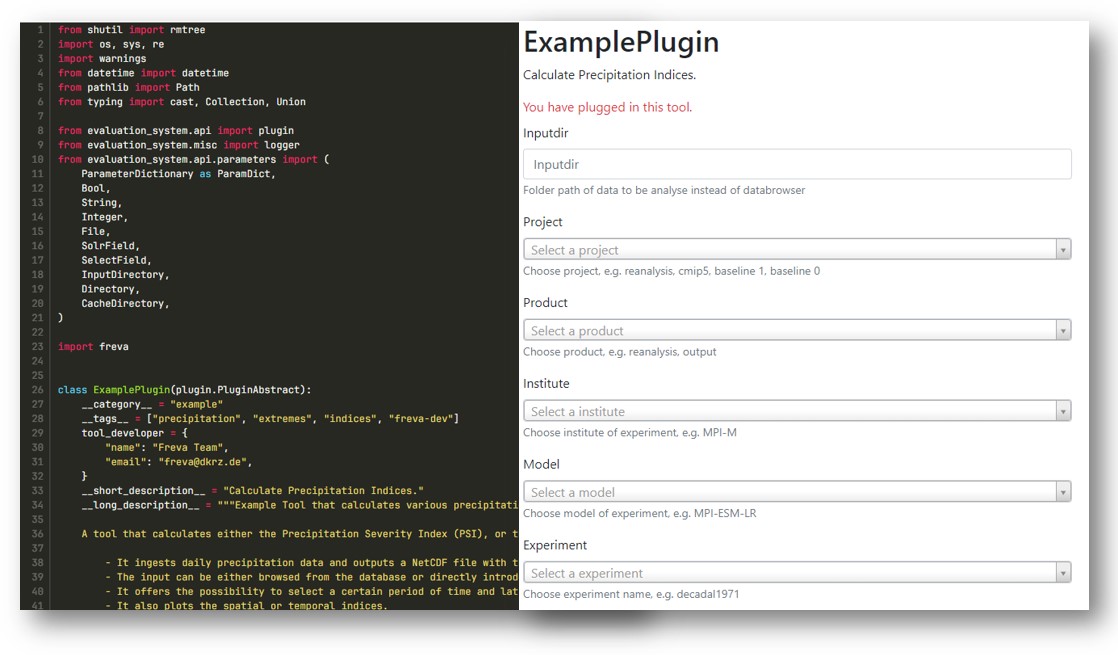
Structure of a Plugin: The Wrapper
The connection to Freva:
- Written in python 3
- Needs to follow a series of standards
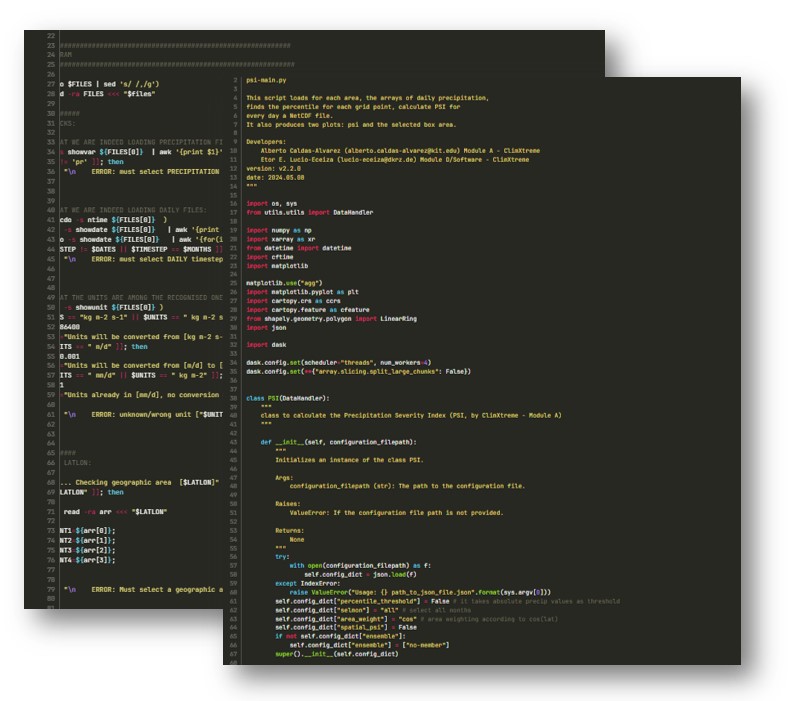
Structure of a Plugin: The tool
The scientific code:
- Written in any* language (python, R, C, FORTRAN, a mix...)
- A single script or multiple scripts and/or folders (subroutines, libraries, etc.).
Structure of a Plugin: Installer
Installs the plugin environment:
- Usually: Makefile (instructions) + .yaml file (libraries)
- It can also be more elaborated: e.g. binary compilation, installation of subroutines...

NOTE: It replaces the dependencies on the HPC (e.g. modules) and makes it more transferable to other e.g. institutions
Git and Gitlab
What is git? 
Is a free and open source Distributed Version Control System:
- Version Control System: a system that tracks and provides control over changes to source code, documentation and configuration files.
- Distributed: a form of version control in which the complete codebase, including its full history, is mirrored on every developer's computer
What is gitlab? 
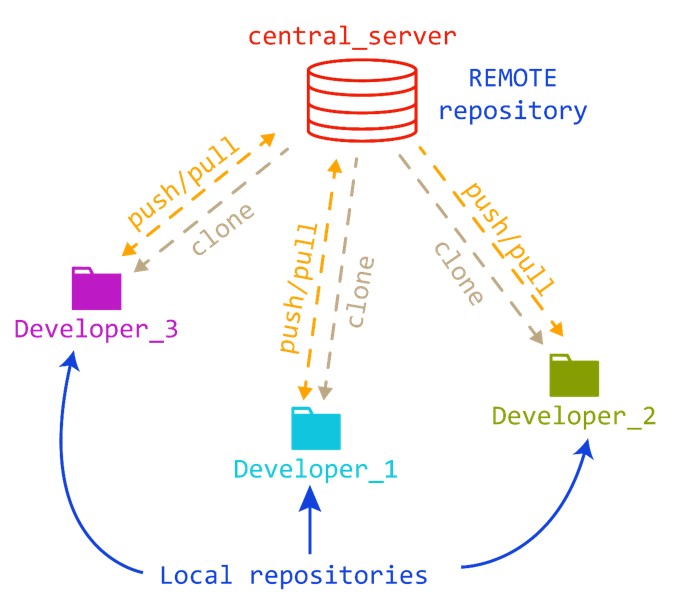
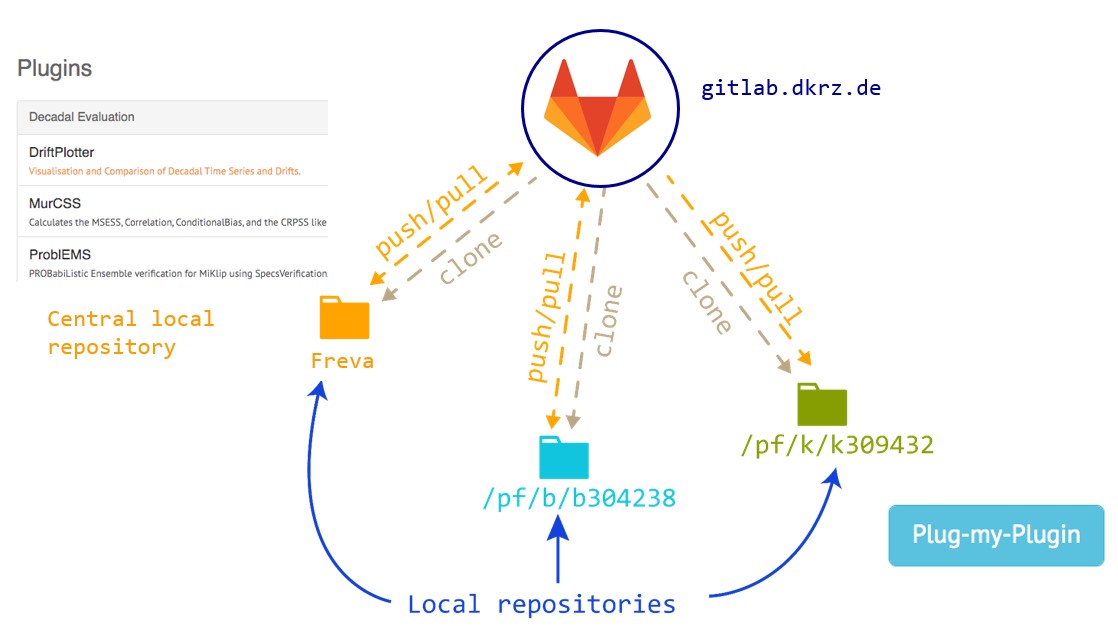
Gitlab and Freva:
- One central local repository for the plugged plugins
- Other local repositories for different developers
- One remote repository for the plugin at gitlab
Gitlab and Freva: location of the plugins
- Under https://gitlab.dkrz.de/freva/plugins4freva project:
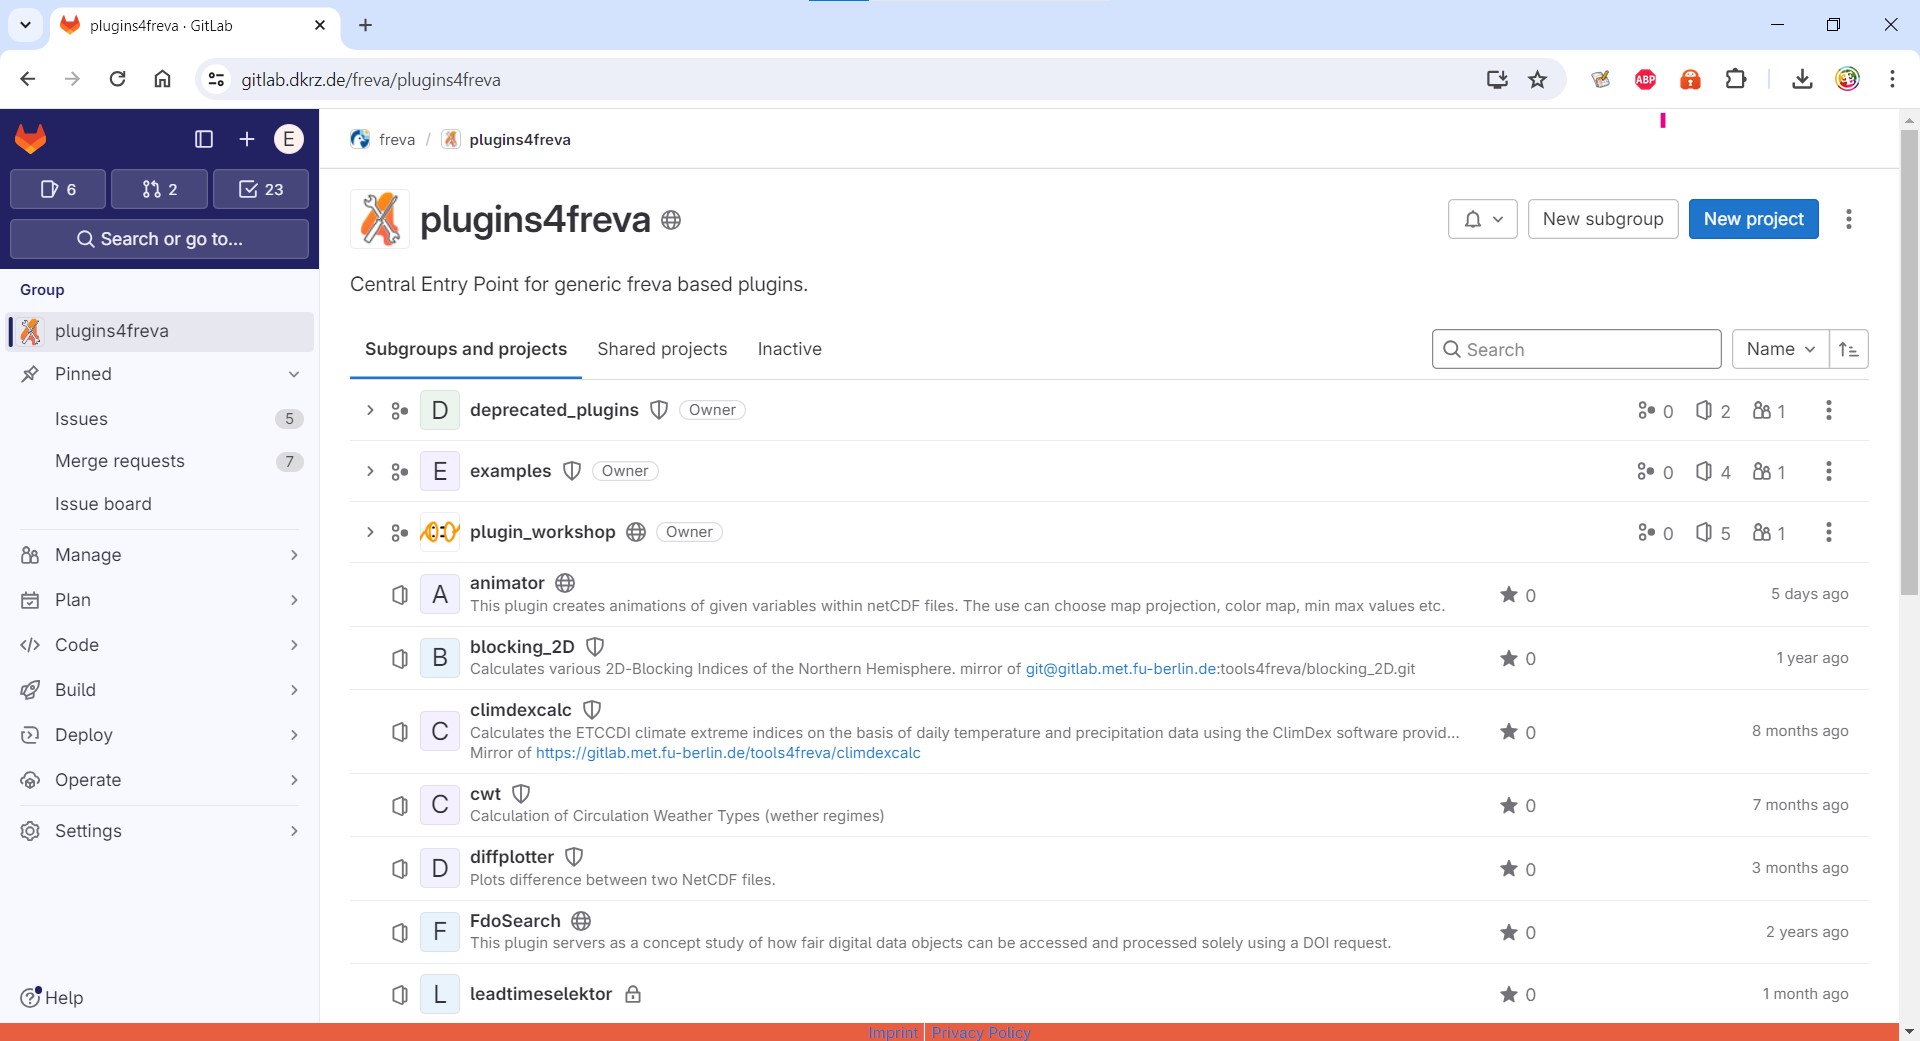
- Other projects have also their own, e.g.:
- climxtreme: https://gitlab.dkrz.de/bm1159/plugins4freva
- regiklim-nukleus: https://gitlab.dkrz.de/ch1187/plugins4freva
- some plugins can be found in different projects (see forks).
Gitlab and Freva: cloning a repository
To download a repository there are 2 ways: via https and via ssh:
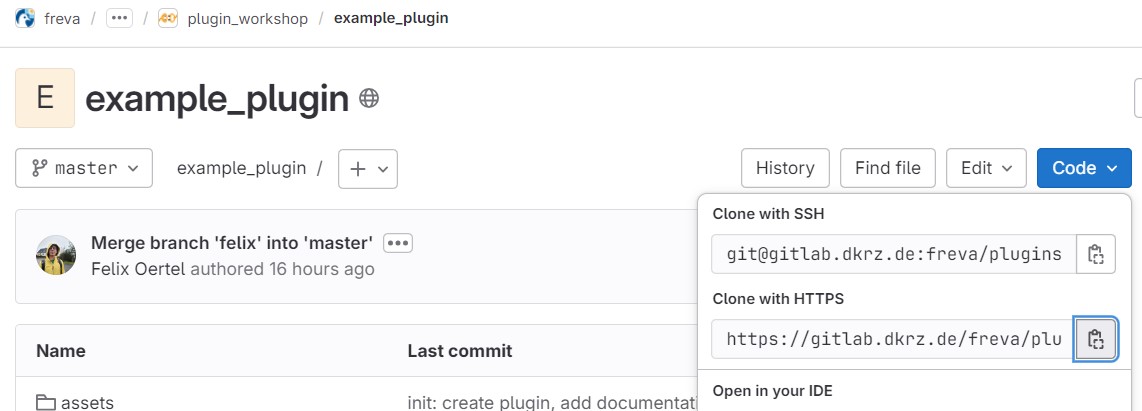
https: straightforward, requires to enter (dkrz) username and password (usually).ssh: convenient, requires to provide a ssh key previously.
In both cases:
$ ssh <username>@levante.dkrz.de
> cd /path/to/my/work/
> git clone https://gitlab.dkrz.de/freva/plugins4freva/plugin_workshop/example_plugin.git
Gitlab and Freva: setting your SSH key
- generate a ssh a private and public (
.pub) key locally (e.g. laptop or levante):
$ ssh-keygen -t ed25519
$ cd ~/.ssh/
$ ls
id_ed25519  id_ed25519.pub
- copy the public key:
$ cat id_ed25519.pub
ssh-ed25519 AAAAC3NzaC1lFDI1YTE5AAAAICUqpXx8AyrNH7HQgPSq9LuB7sTEmXP4ODqOnaHVPPQ6 username@levante
- add the public key in gitlab (
user>preferences>ssh keys):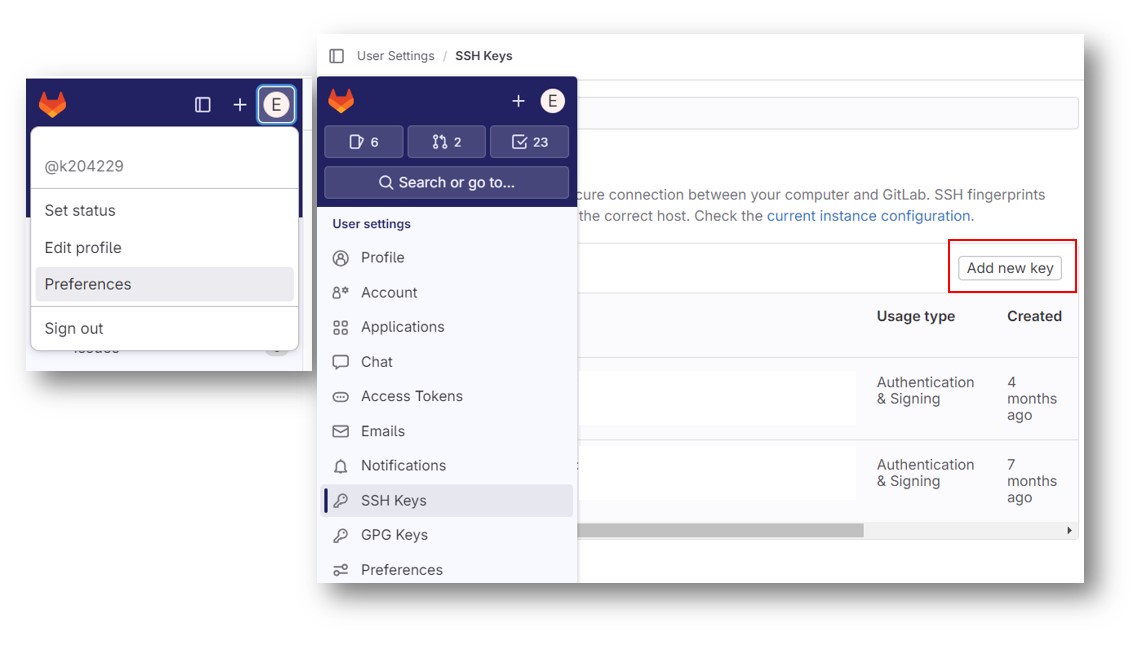
Gitlab and Freva: creating a new project
- If we already had an existing Git repository:
$ cd NEW_PLUGIN # for example
$ git remote rename origin old-origin
$ git remote add origin git@gitlab.dkrz.de:freva/plugins4freva/new_plugin.git
$ git push -u origin --all
$ git push -u origin --tags
- If we did not already have an existing Git repository:
$ cd NEW_PLUGIN # for example
$ git init
$ git remote add origin git@gitlab.dkrz.de:freva/plugins4freva/new_plugin.git
# create your new files and folders
$ git add .
$ git commit -m "Initial commit of my new project"
$ git push -u origin master
Now you could (hypothetically) go to https://gitlab.dkrz.de/freva/plugins4freva/new_plugin
License of Plugins
What kind of License should I follow?
The Freva code follows a BSD3 license, a permissive open-source license with minimal restrictions:
- It allows for wide usage, including in proprietary software.
- it imposes very few restrictions on how the software can be redistributed.
In principle, any derived product from Freva (i.e. plugins), should follow this license. Unless stated otherwise by the developer.
What kind of License should I follow?
- We encourage open-source software to foster collaboration within and outside your projects.
- That said, common courtesy should be expected, e.g.:
- reference to the first manuscript where the developer used the plugin (the plugin documentation is useful for this!).
- contacting him/her in case there is no such manuscript.
Connecting your IDE / Code Editor to a remote session using SSH
1. VS-Code 
Open a new window in VS Code. There are several ways to connect to a remote session, as indicated in the picture below:
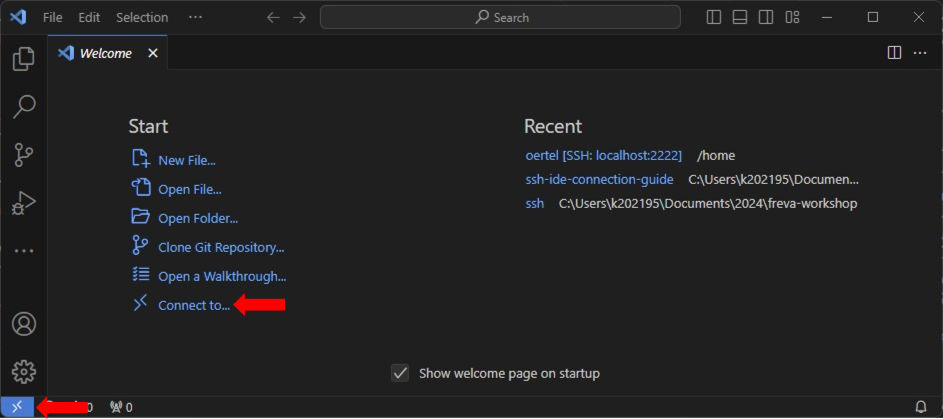
Clicking either of the buttons opens a prompt at the top of the window, giving you several options to start a remote session:
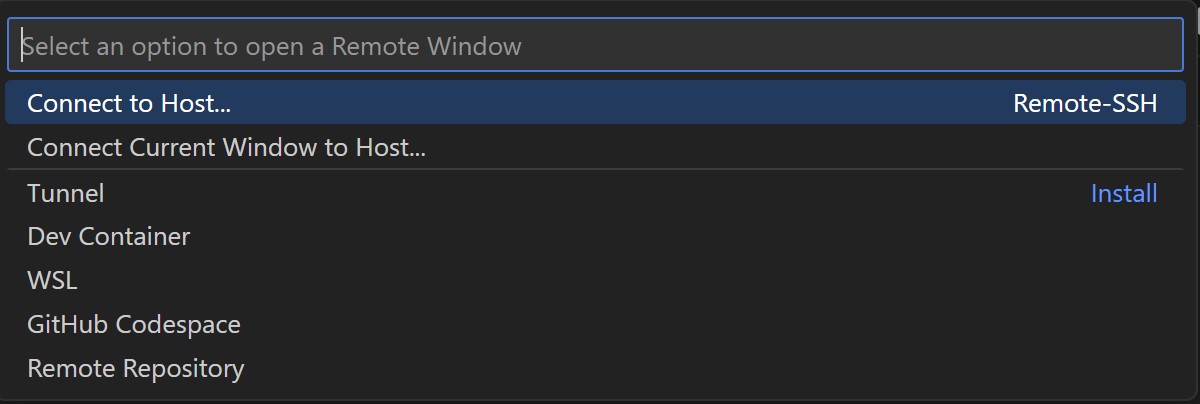
Click "Connect Current Window to Host..." ("Connect to Host..." opens a new window for the connection).
You can type in the address of the remote host that you want to connect to or, in case the host is specified in your ssh config file (.ssh/config or ssh_config), select them from the list of hosts. To connect to levante, enter [k-number@]levante.dkrz.de :

The first time connecting to a host, you will be prompted to specify the OS of the remote host (i.e. Linux / Windows / macOS).
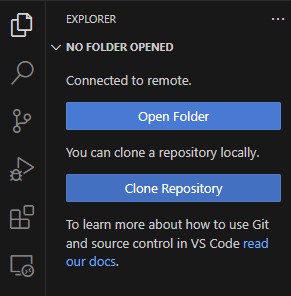
Depending on the authentication set up for the remote host, you might be prompted to type in a password. Once the connection has been established, your can open a folder on the remote host, like you would do on your local machine (by pressing Ctrl + K, Ctrl + O or by pressing "Open Folder"):
You may be prompted again to type in the password at this point. The window should refresh and give you access to the remote folder that you selected in the previous step, similar to what can be seen in the following image:
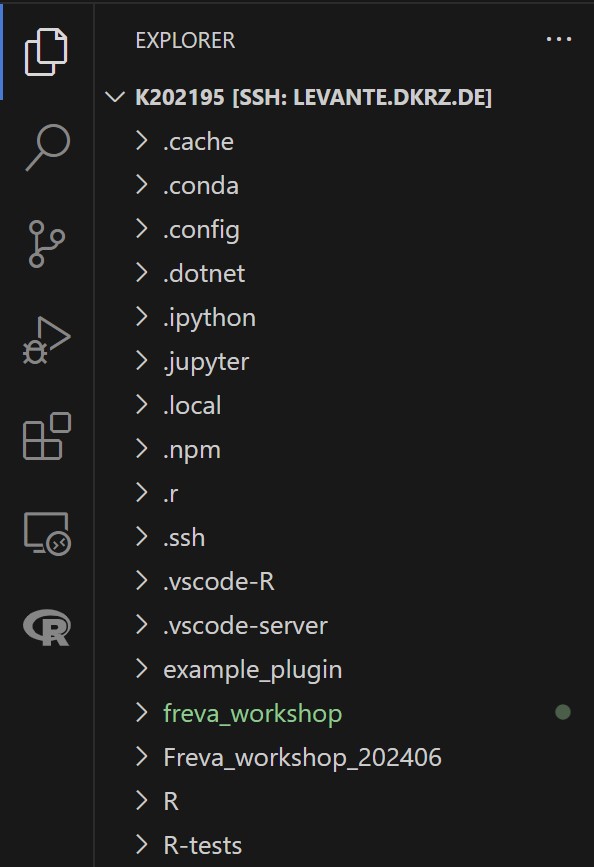
From here you can use the editor to work with remote files basically as you would with files on your local machine. Any terminals opened in this window will also connect to the remote host.
For detailed documentation on remote development using VS Code, including development on dev containers or WSL, click here.
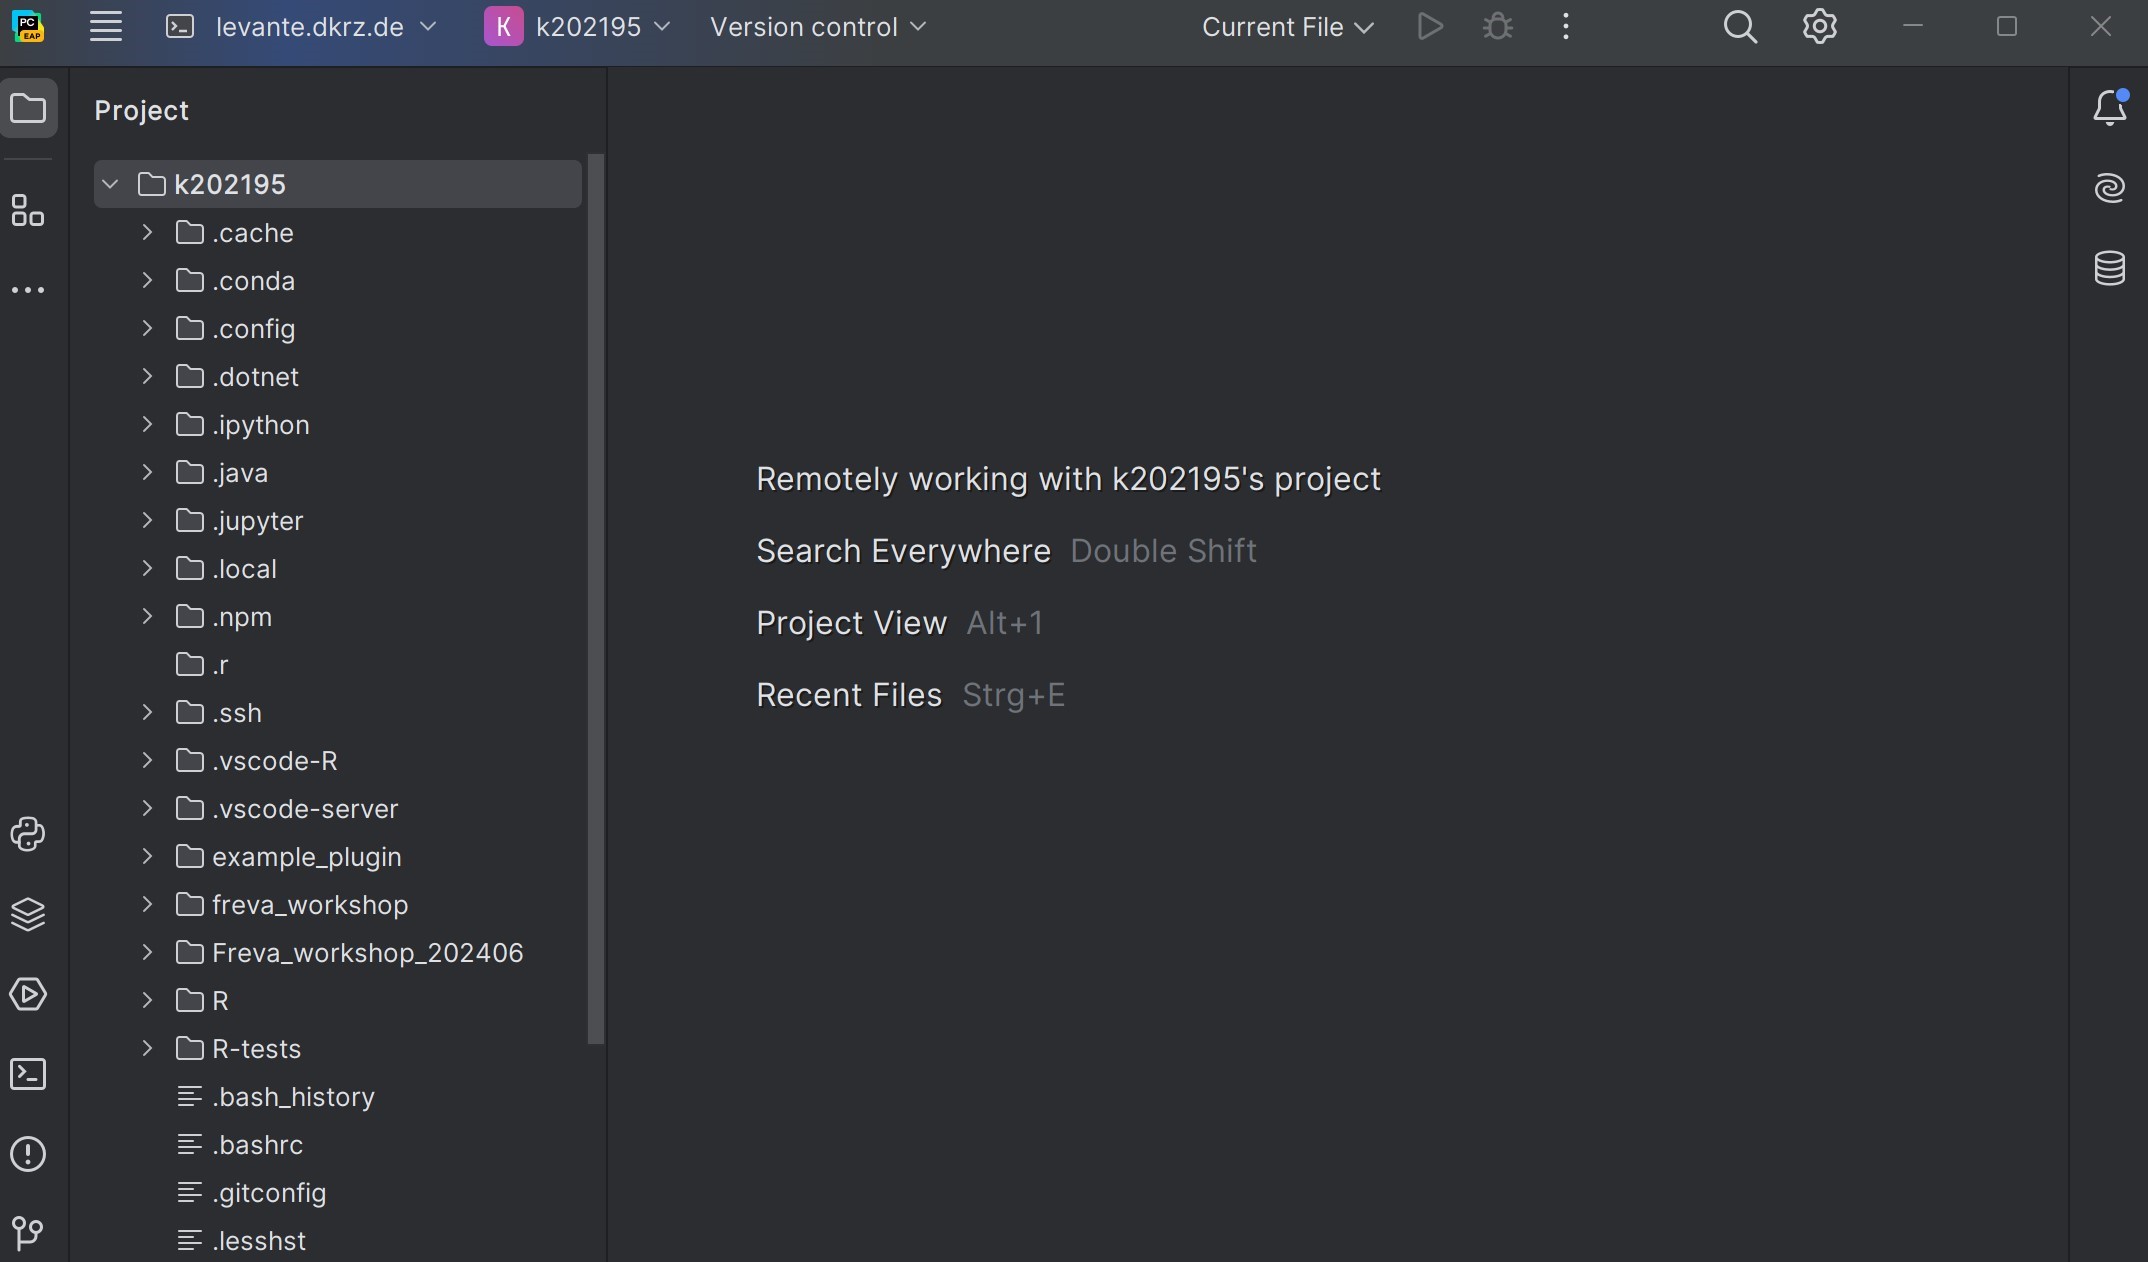
2. PyCharm 
😱 Remote Development is currently in beta and only supported for the Professional Version of PyCharm!
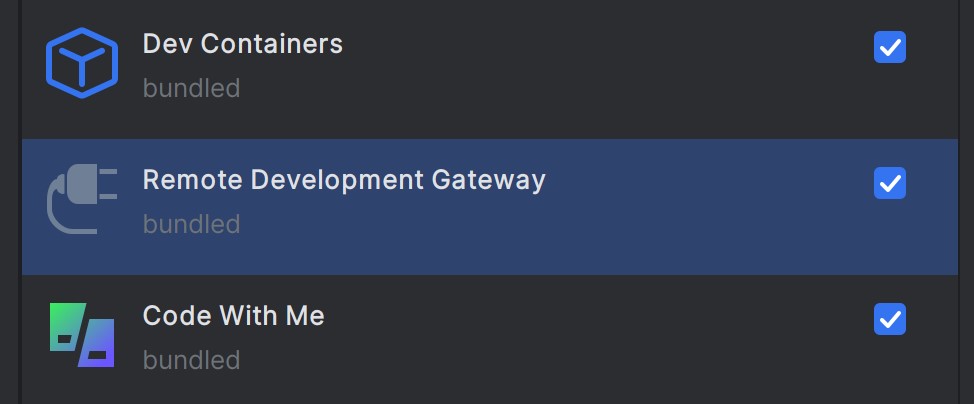
Open your Plugins (Ctrl+Alt+S) and confirm that "Remote Development Gateway" is installed and that it is enabled:
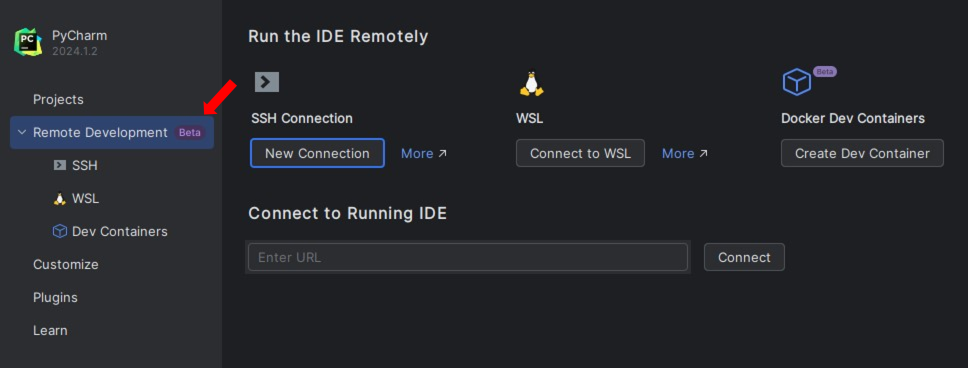
To open a remote session in PyCharm, go to the welcome screen and click on the "Remote Development" Tab in the left side bar. This should give you a number of options, including the option to connect to a remote session using SSH:
To establish a new SSH Connection, click "New Connection" below the SSH Connection option. This should open the following dialogue:
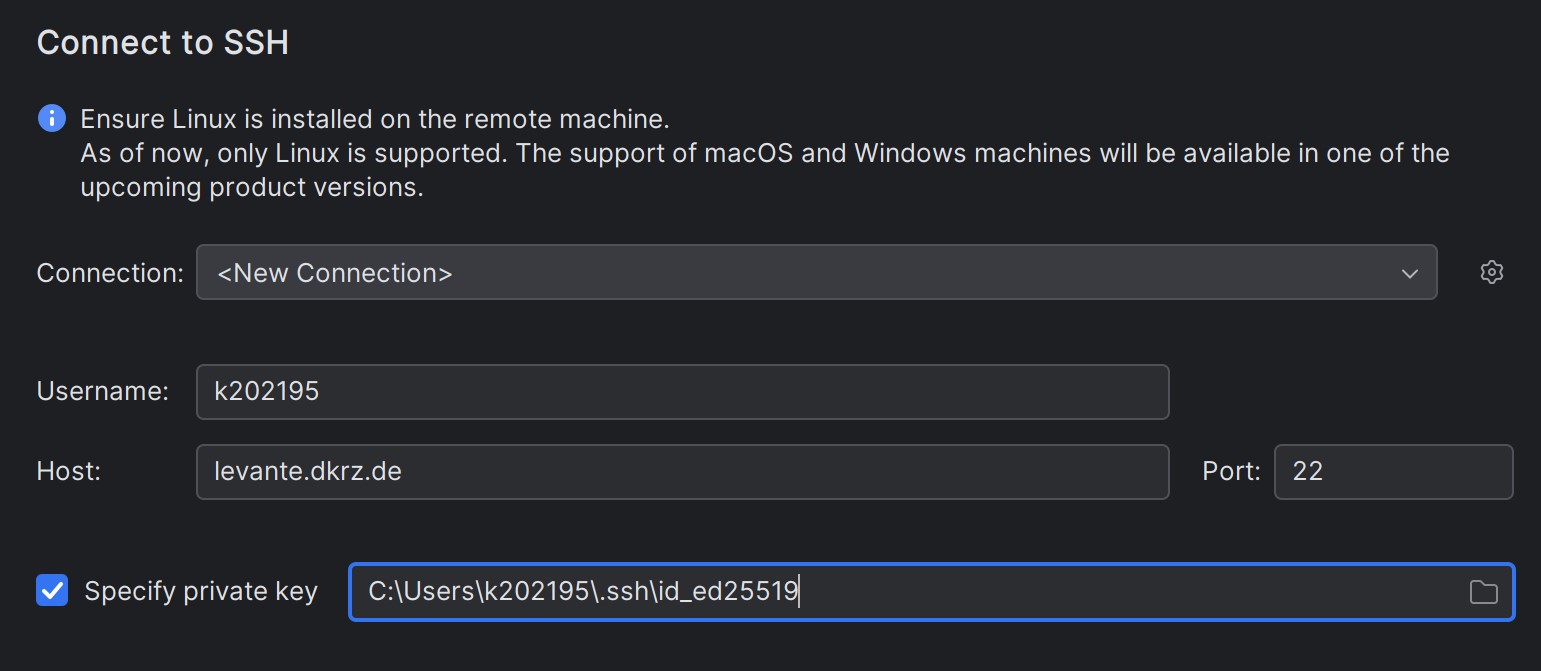
⚠ Note that PyCharm currently only supports connecting to remote hosts running Linux.
Again, depending on the type of authentication set up by the remote host, you may be prompted to enter a password to establish the remote connection.
In the next step (pending the successful connection to the remote host), you will be asked to set the IDE version (i.e. the version of the IDE that will be installed on the remote host) and the project directory (i.e. the directory on the remote host that contains the project files that you will be working with):
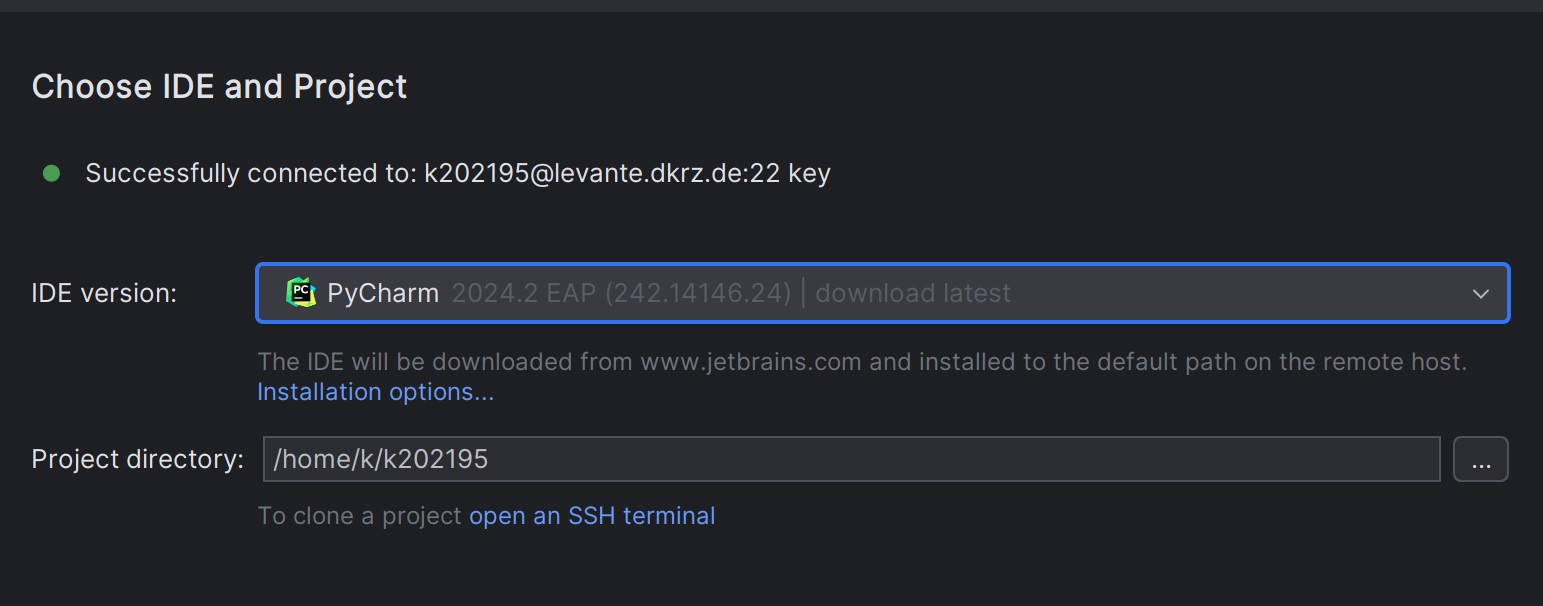
Click "Download IDE and Connect". The installation of the selected IDE on the remote host might take a while. Once the installation is complete, a window containing the remote IDE should open.
The remote IDE gives you the ability to work with project files, much like you would with local project files. Any terminal sessions started in this IDE will also be connected to the remote host.
For detailed documentation on remote development using PyCharm, click here.
3. R Studio 
There is currently only one method of using R Studio on a remote host that is officially supported by R, namely by connecting to an instance of R Studio Server running on the remote host. The previously available alternative, by creating a remote connection in R Studio Desktop Pro, has been removed since version 2023.06.2.
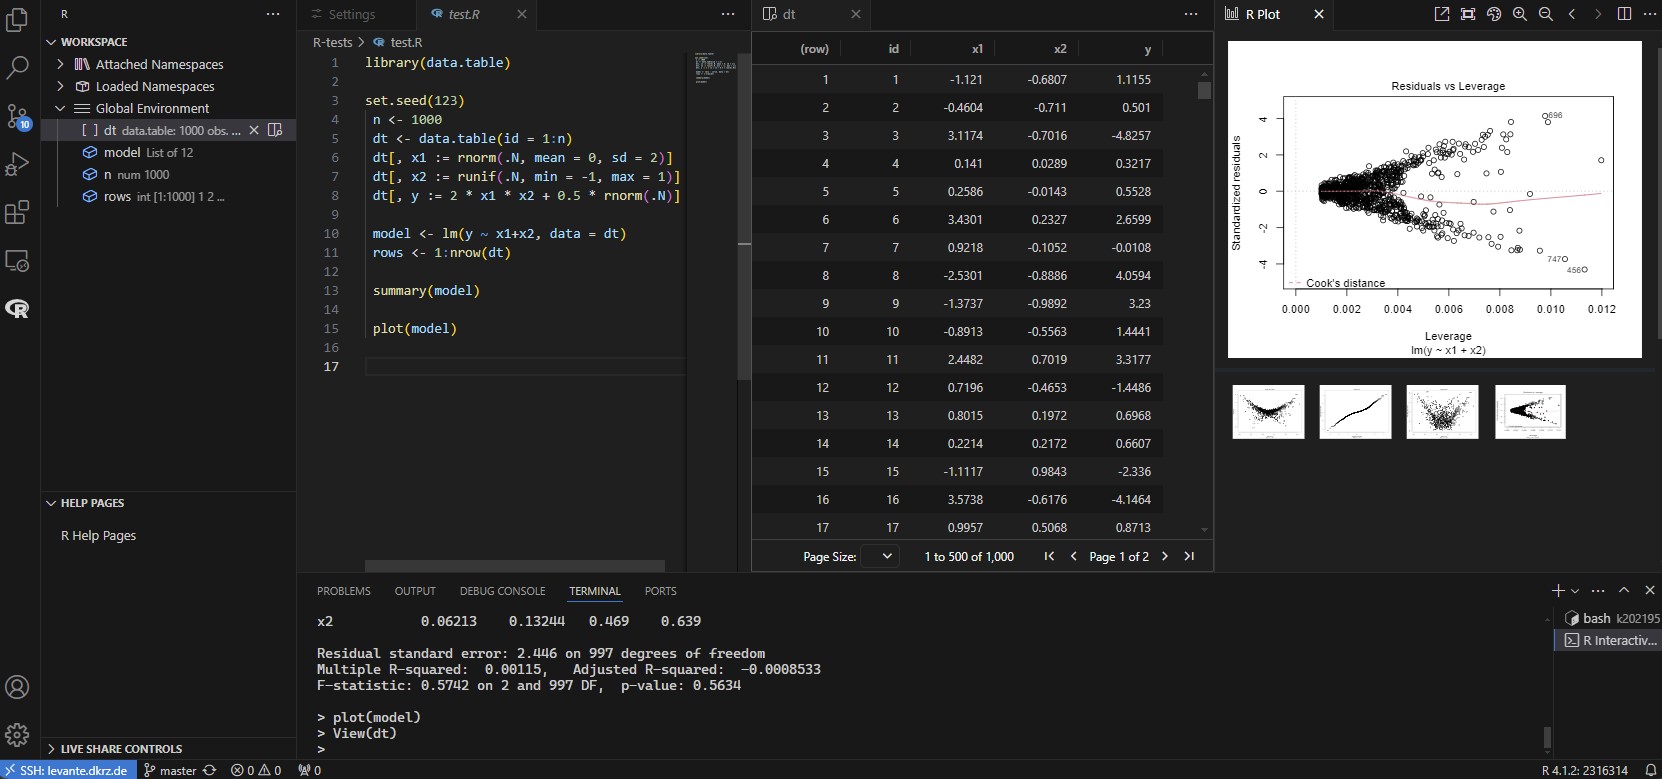
However, R Studio Server is not available on Levante, so creating a remote development environment instance this way is not possible. However, it is possible to remotely develop and execute R-code by using the VS Code R Extension.
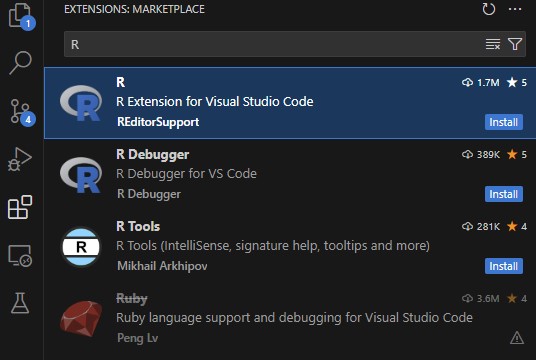
First, connect to Levante as outlined in the VS Code ![]() section of this guide. Once the connection is established, you will want to install the R (
section of this guide. Once the connection is established, you will want to install the R (REditorSupport.r) and R Debugger (RDebugger.r-debugger) Extensions, as shown below:
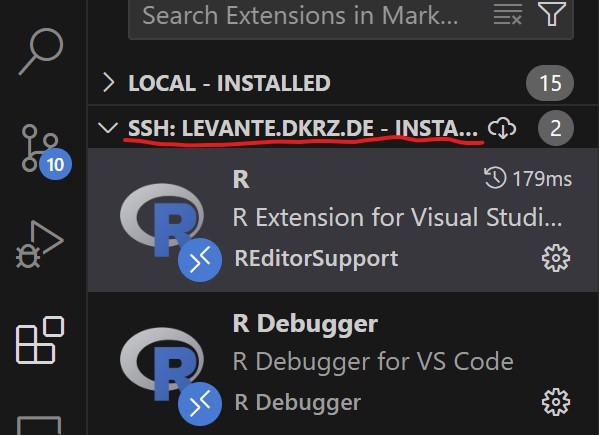
Make sure that you have installed the extensions to the remote host, and not your local machine, by going to Extensions (Ctrl+Shift+X):
In a terminal that is connected to levante via ssh (e.g. in the VS Code window connected to levante), type in the following command:
$ module load r
The result should be something along the lines of:
[k202195@levante3 ~]$ module load r
Autoloading openjdk/17.0.0_35-gcc-11.2.0

Loading r/4.1.2-gcc-11.2.0
  Loading requirement: openjdk/17.0.0_35-gcc-11.2.0
[k202195@levante3 ~]$
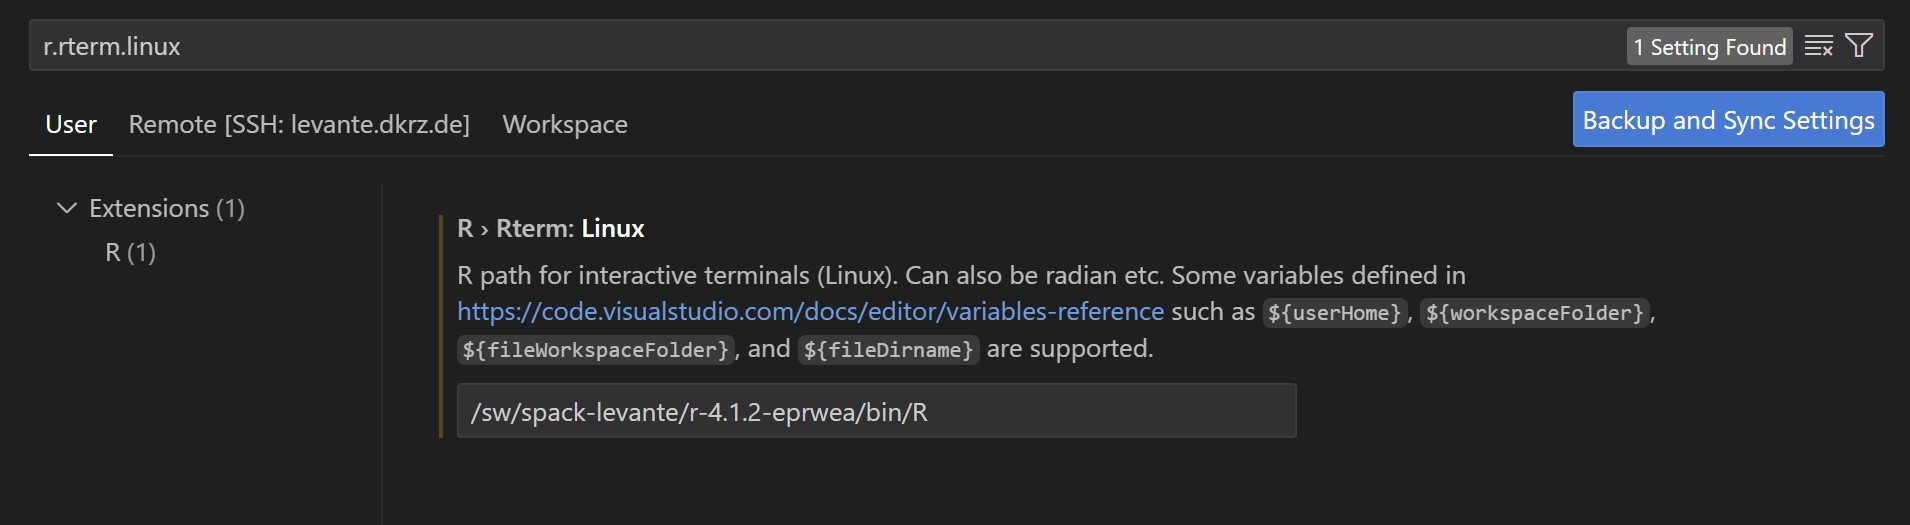
We'll need to find out, where R is located on the remote host. We do this by using the command:
$ which R
The output should be something like:
[k202195@levante3 ~]$ which R
/sw/spack-levante/r-4.1.2-eprwea/bin/R
[k202195@levante3 ~]$
Copy this path to your clipboard.
Install the httpgd package to embed live R graphics into the VS Code environment. You can do this by running the following commands in a terminal on the remote host:
# Start and R command line session
$ R
The following command is executed in the R command line session
install.packages("httpgd")
Open the settings (Ctrl + ,) and type r.rterm.linux in the search bar as shown in the image below. Make sure that you paste the previously copied path into the field, as depicted:
Once that is done, open any R file on the remote host. Once an R terminal is ready, you could either select the code or put the cursor at the beginning or ending of the code you want to run, press (Ctrl+Enter), and then code will be sent to the active R terminal.
If you want to run an entire R file, open the file in the editor, and press Ctrl+Shift+S and the file will be sourced in the active R terminal:
What is a Freva Wrapper?
Freva Wrapper Main Classes 
- PluginAbstract Class Functions
- parameters.py Classes
- _ConfigWrapper Class

Special Variables:
| Variables | Description |
|---|---|
| USER_BASE_DIR | Absolute path to the central directory for this user. |
| USER_OUTPUT_DIR | Absolute path to where the plugin outputs for this user are stored. |
| USER_PLOTS_DIR | Absolute path to where the plugin plots for this user are stored. |
| USER_CACHE_DIR | Absolute path to the cached data (temp data) for this user. |
| USER_UID | The users’ User Identifier. |
| SYSTEM_DATE | Current date in the form YYYYMMDD (e.g. 20120130). |
| SYSTEM_DATETIME | Current date in the form YYYYMMDD_HHmmSS (e.g. 20120130_101123). |
| SYSTEM_TIMESTAMP | Milliseconds since epoch (i.e. e.g. 1358929581838). |
| SYSTEM_RANDOM_UUID | A random Universal Unique Identifier (e.g. 912cca21-6364-4f46-9b03-4263410c9899). |
Example:
output_file='$USER_OUTPUT_DIR/myfile_${SYSTEM_DATETIME}blah.nc'
PluginAbstract Class
Function: class_basedir
class PluginAbstract(abc.ABC):
    """Base class that is used as a template for all Freva plugins.
    Any api wrapper class defining Freva plugins must inherit from this class."""

    @deprecated_method("PluginAbstract", "class_basedir")
    def getClassBaseDir(self) -> Optional[str]:
        """Deprecated method for class_basedir."""

    def class_basedir(self) -> str:
        """Get absolute path to the module defining the plugin class."""
PluginAbstract Class
Function: call
class PluginAbstract(abc.ABC):
    """Base class that is used as a template for all Freva plugins.
    Any api wrapper class defining Freva plugins must inherit from this class."""

    def call(
        self,
        cmd_string: Union[str, list[str]],
        check: bool = True,
        **kwargs,
    ) -> sub.Popen[Any]:
        """Run command with arguments and return a CompletedProcess instance."""
PluginAbstract Class
Function: call and class_basedir - Example
from evaluation_system.api import plugin
class TemplatePlugin(plugin.PluginAbstract):
    def run_tool(self, config_dict=None)
        self.call(
            f"{self.class_basedir}/main_code.sh {config_dict}"
        )
        # or
        self.call(
            f"{Path(__file__).parent}/main_code.sh {config_dict}"
        )
        # or
        self.call(
            f"{os.getenv(USER_BASE_DIR)}/main_code.sh {config_dict}"
        )
PluginAbstract Class
Function: add_output_to_databrowser
class PluginAbstract(abc.ABC):
    @deprecated_method("PluginAbstract", "add_output_to_databrowser")
    def linkmydata(self, *args, **kwargs):  # pragma: no cover

    def add_output_to_databrowser(
        self,
        plugin_output: os.PathLike,
        project: str, # user-<user-id>
        product: str, # project.product
        *,
        model: str = "freva",
        institute: Optional[str] = None,
        ensemble: str = "r1i1p1",
        time_frequency: Optional[str] = None,
        variable: Optional[str] = None,
        experiment: Optional[str] = None,
        index_data: bool = True,
    ) -> Path:
PluginAbstract Class
Function: add_output_to_databrowser - Example
from evaluation_system.api import plugin
class TemplatePlugin(plugin.PluginAbstract):
    def run_tool(self, config_dict=None)
        self.add_output_to_databrowser(
            plugin_output=config_dict["outputdir"],
            project=config_dict.get("project", "default_project"),
            product=config_dict.get("product", "default_product"),
            model=config_dict.get("model", "default_model"),
            institute=config_dict.get("institute", "default_institute"),
            time_frequency="mon",
        )
How to find it in Freva:
freva databrowser product=project.product project=user-<user-id>
PluginAbstract Class
Function: prepare_output
class PluginAbstract(abc.ABC):
    """Base class that is used as a template for all Freva plugins.
    Any api wrapper class defining Freva plugins must inherit from this class."""

    @deprecated_method("PluginAbstract", "prepare_output")
    def prepareOutput(self, *args) -> dict[str, dict[str, str]]:
        """Deprecated method for :class:`prepare_output`. """

    def prepare_output(
        self, output_files: Union[str, list[str], dict[str, dict[str, str]]]
    ) -> dict[str, dict[str, str]]:
        """Prepare output for files supposedly created."""
ParameterType Class
class ParameterType(initOrder):
    """Base class for all parameter types.
    All available parameter types inherit from this class. The class creates
    a parameter object holding the following user defined information.
    """
    def __init__(
        self,
        name=None,
        default=None,
        mandatory=False,
        max_items=1,
        item_separator=",",
        regex=None,
        version=1,
        help="No help available.",
        print_format="%s",
        impact=Parameter.Impact.affects_values,
    ):
ParameterDictionary Class
class ParameterDictionary(dict):
    """Directory holding all plugin parameters for a ``Freva`` plugin.
    This class behaves like a built-in ``dict`` with additional features.
    The most prominent feature is that the order of added items is preserved,
    as opposed to a normal build-in ``dict``.
    """
    def __init__(self, *parameters: ParameterType) -> None:
_ConfigWrapper class
class _ConfigWrapper:
    """Convenience class that helps to dynamically set the location of the
    evaluation system config file."""
    _env: str = "EVALUATION_SYSTEM_CONFIG_FILE"
    def __init__(
        self,
        default_file: str,
    ):
        self.default_file = default_file
    def __fspath__(self) -> str:
        return os.environ.get(self._env, self.default_file)
    def __repr__(self) -> str:
        return self.__fspath__()
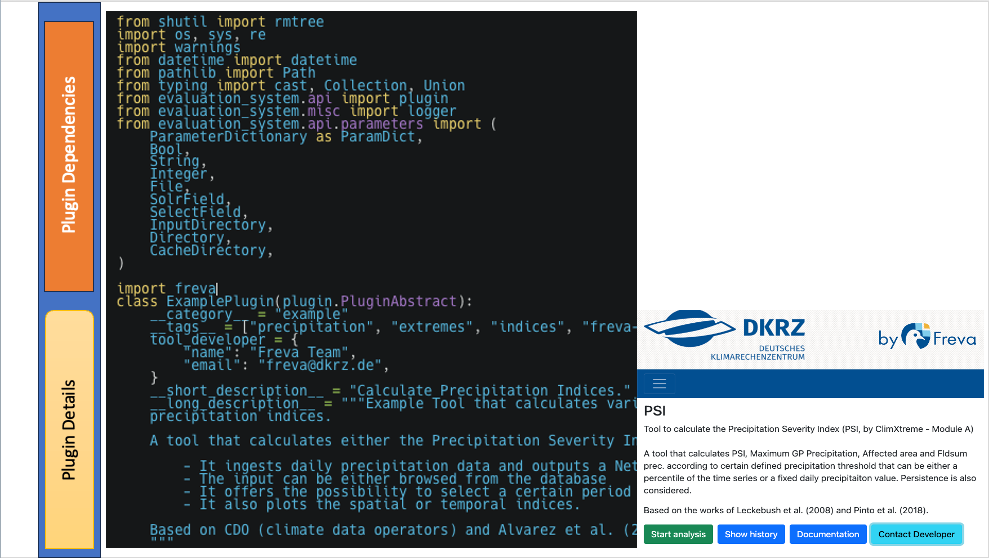
Freva Wrapper Structure
- Plugin Details
- Plugin Parameters
- Plugin Methods

Freva Wrapper Structure: 1. Details
from evaluation_system.api import plugin
class TemplatePlugin(plugin.PluginAbstract):
    __version__ = (0, 0, 0)
    """
    def __version__(self) -> tuple[int, int, int]:
        # 3-value tuple representing the plugin version.
    """
    __short_description__: str = "template plugin"
    __category__ = "something"
    """
    def __category__(self) -> str:
        # Optional category this plugin belongs to.
        return ""
    """
    __tags__ = ["something", "somethingelse"]
    """
    def __tags__(self) -> list[str]:
        # Optional tags, that are the plugin can be described with.
        return [""]
    """
    tool_developer: Optional[str] = "someonename someonefamily"
    __long_description__: Optional[str] = "template plugin long"
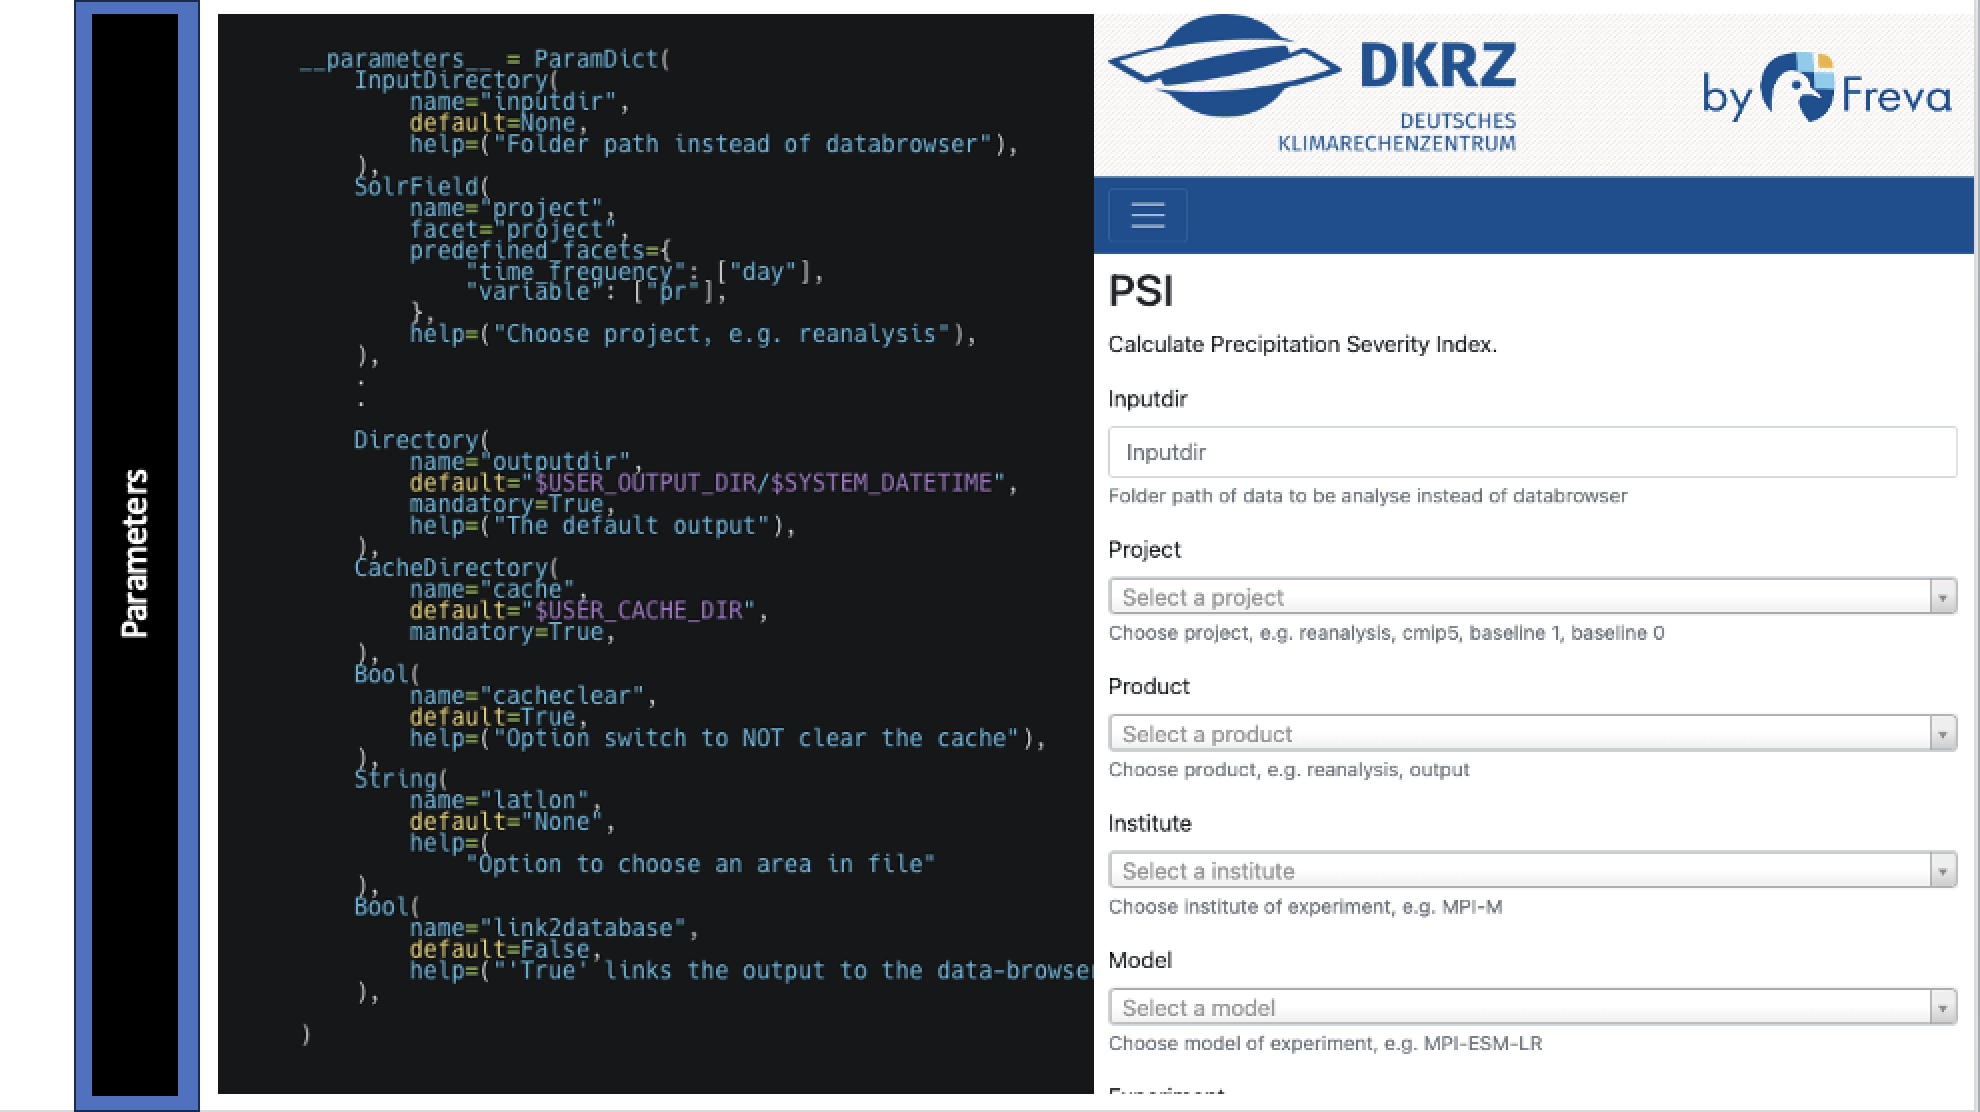
Freva Wrapper Structure: 2. Parameters
from evaluation_system.api.parameters import ParameterDictionary, String, Bool
class TemplatePlugin(plugin.PluginAbstract):
    __parameters__ = ParameterDictionary(
        String(ParameterType),
        """
        Example:
            String(
                name="string",
                default="None",
                help=(
                    "some helps"
                ),
            )
        """
        Bool(ParameterType),
        """
        Example:
            Bool(
                name="checkbox",
                default=True,
            )
        """
    )
Freva Wrapper Structure: 2. Parameters
from evaluation_system.api.parameters import ParameterDictionary, SolrField, InputDirectory, String
class TemplatePlugin(plugin.PluginAbstract):
    __parameters__ = ParameterDictionary(
        InputDirectory(String),
        """
        Example:
            InputDirectory(
                name="inputdirectory",
            ),
        """
        SolrField(String),
        """
        class SolrField(String):
            # A parameter using solr for finding valid values.
            def __init__(
                self,
                *args,
                facet: str,
                group: int = 1,
                multiple: bool = False,
                predefined_facets: Optional[list[str]] = None,
                editable: bool = True,
                **kwargs,
            ):
        """
    )
Freva Wrapper Structure: 2. Parameters
from evaluation_system.api.parameters import ParameterDictionary, String, CacheDirectory, SelectField, Directory
class TemplatePlugin(plugin.PluginAbstract):
    __parameters__ = ParameterDictionary(
        Directory(String),
        CacheDirectory(Directory),
        SelectField(String),
        """
        class SelectField(String):
            # Select field to select parameter from predefined values.
            def __init__(self, options: dict[str, str], *args, **kwargs):
        Example:
        SelectField(
            options={"first": "1st", "second": "2nd"},
        ),
        """
        Integer(ParameterType),
        """
        Example:
            Integer(
                name="integer",
                default=1,
            )
        """
    )
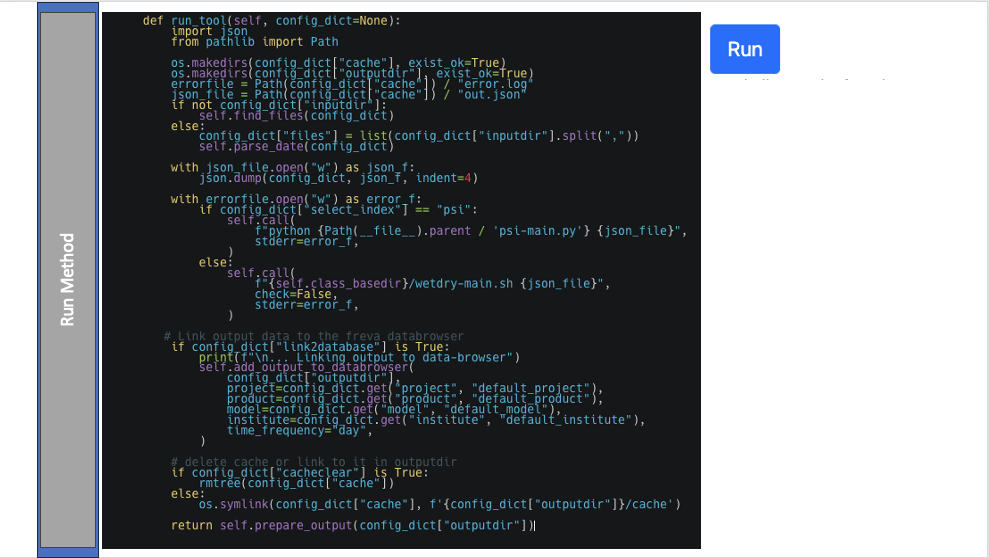
Freva Wrapper Structure: 3. Methods
from evaluation_system.api import plugin
class TemplatePlugin(plugin.PluginAbstract):
    def run_tool(self, config_dict=None):
        self.call(f"python template_plugin.py arg1 arg2 {config_dict}")
        self.call(f"template_runner.sh {config_dict}")
        self.add_output_to_databrowser(
            output_dir,
            project=config_dict["project"], # user-<user-id>
            product=config_dict["product"], # f"{config_dict["project"]}.{config_dict["project"]}"
            institute=config_dict["institute"],
            model=config_dict["model"],
            experiment=config_dict["experiment"],
            time_frequency=config_dict["time_frequency"],
            variable=config_dict["variable"],
            ensemble=config_dict["ensemble"],
        )
        return self.prepare_output(config_dict["outputdir"])
Recommended: Keep track of errors
from evaluation_system.api import plugin
import json
class TemplatePlugin(plugin.PluginAbstract):
    def run_tool(self, config_dict=None):
        json_file = Path(config_dict["cache"]) / "out.json"
        with json_file.open("w") as json_f:
            json.dump(config_dict, json_f, indent=4)
        with errorfile.open("w") as error_f:
            self.call(
                f"{self.class_basedir}/main_runner.sh {json_file}",
                stderr=error_f,
            )
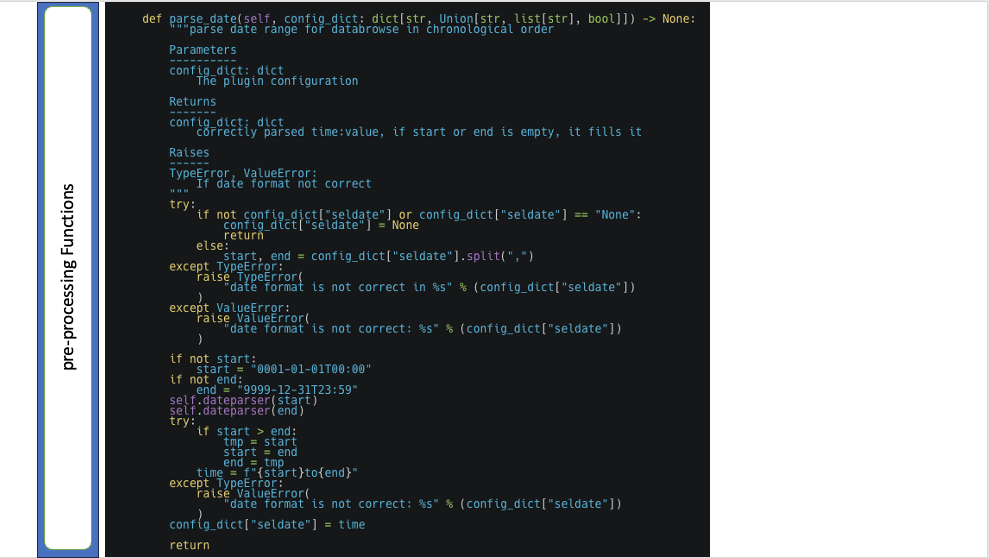
Additional: How to deal with JSON files in the main script of plugin
Python:
import json
import sys
with open(sys.argv[1]) as f:
    config_dict = json.load(f)
Bash
_jq(){
    jq -r ${1} ${2} | sed "s/null/None/g;s/true/True/g;s/false/False/g"

}
export CACHE="$(_jq .cache $1)"
export OUTPUTDIR="$(_jq .outputdir $1)"
Wrapper Illustration
Wrapper Illustration
Wrapper Illustration
Wrapper Illustration
How To Install All Needed Libraries Of A Plugin
Why the need?
- Formerly, we relied on HPC modules to run plugins' software.
- Less than ideal when migrating to newer HPC/other institutions!
- Now, all necessary software installed in a
conda/mambaenvironment at each repo folder.
Steps to Install Necessary Packages 

- Define an Env YAML file
- Install env via Conda
- Activate Environment
- Alternative: Makefile

Define an Env YAML file
e.g. plugin-env.yml:
channels:
    - conda-forge
dependencies:
    - r-base
    - pip
Install env via Conda
- The environment must be located at the same level as the wrapper file!
- The environment must be located named
plugin_env/so Freva recognizes it!
mamba env create --prefix ./plugin_env -f plugin-env.yml
Activate Environment
conda activate plugin_env/bin/activate
More flexible approach via Makefile
We can define a Makefile as below and then after definition of environment.yml, install all the dependencies listed above via make commands. But first and foremost, we need to ensure, we have make installed on our machine.
env:
	@# Installs a conda environment with R and the IDF package
	@if [ -d "./plugin_env" ]; then \
		rm -rf ./plugin_env; \
	fi
	conda env create --prefix ./plugin_env -f environment.yml --force
	Rscript -e 'install.packages("IDF", repos="https://CRAN.R-project.org/")'
cartopy:
	@# Download various cartopy shape-files
	@if [ -d "./cartopy" ]; then \
		rm -rf ./cartopy; \
	fi
	./plugin_env/bin/python3 assets/cartopy_download.py physical cultural
.PHONY: env cartopy
- Using
mambainstead of usingcondacan make the way of installation faster.
You can take a look at a plugin template here.
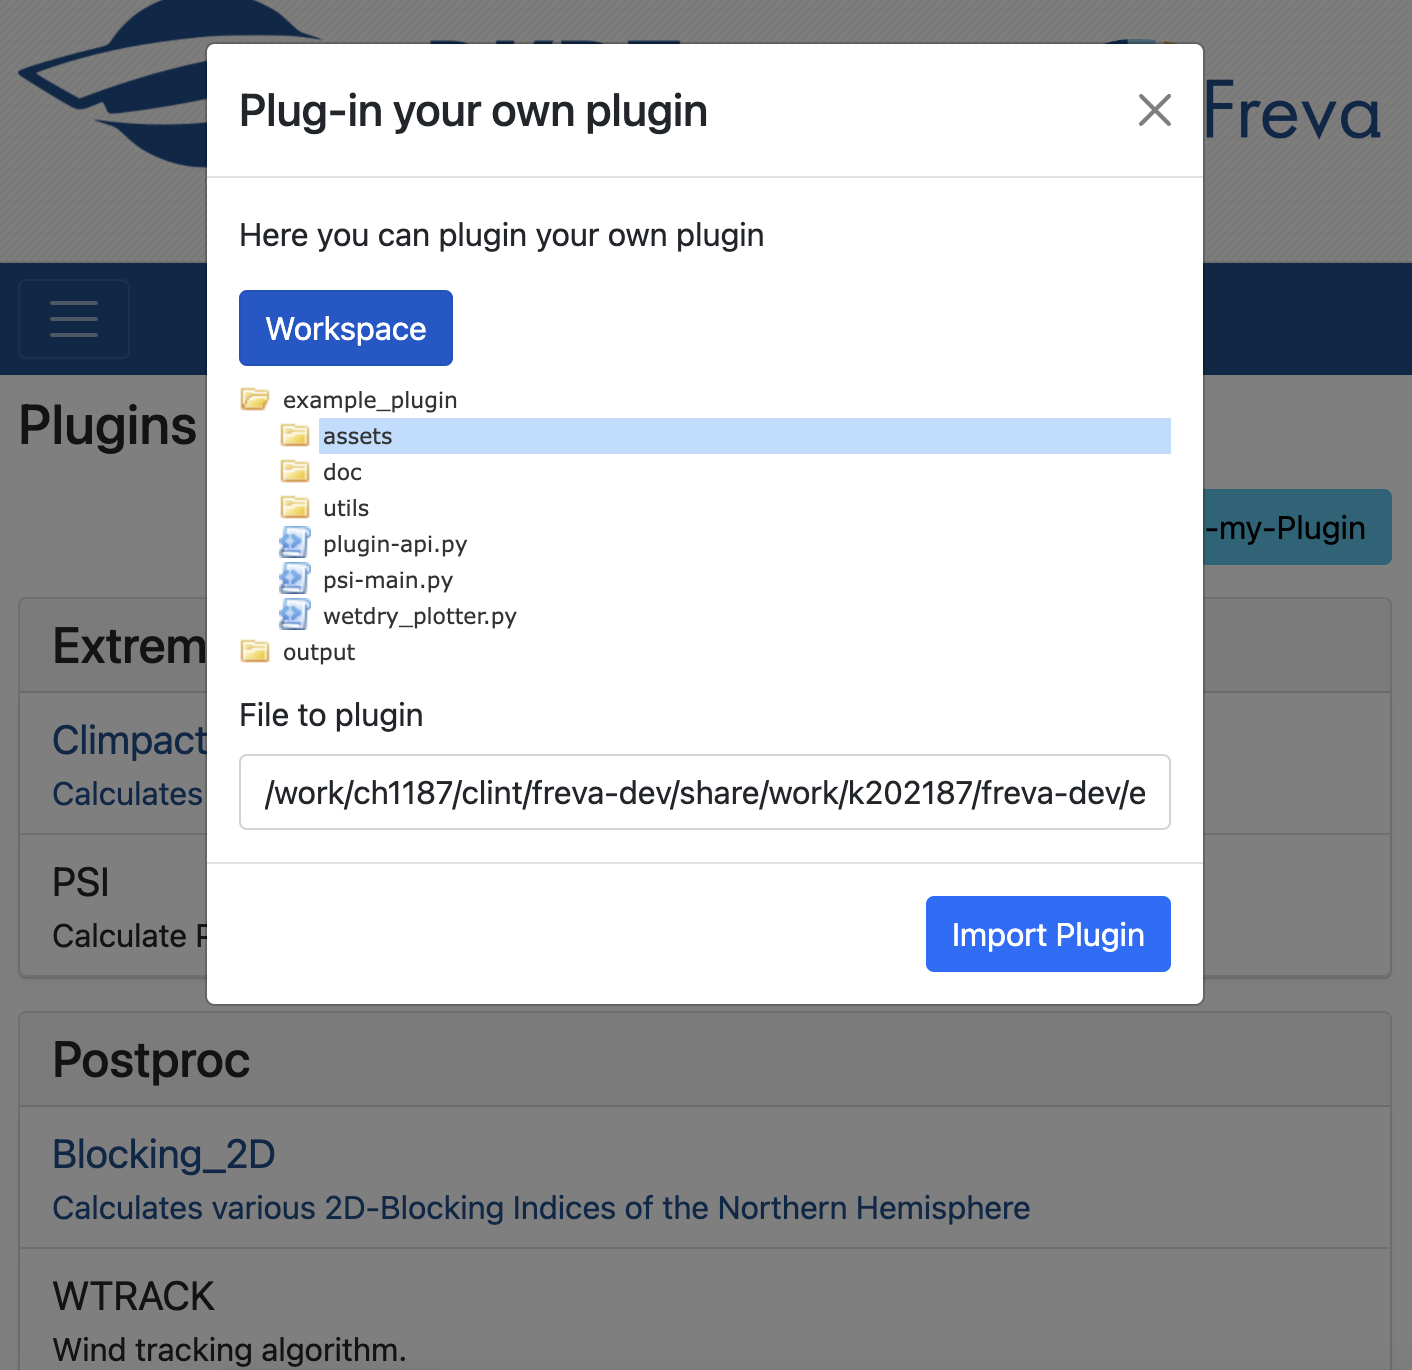
How To Plug a Tool into Freva
Plug a Tool into Freva 
- Plug into Freva via CLI
- Plug into Freva via Freva-Web

Plug a tool into Freva

Plug a tool into Freva
In this step we need to clone a plugin in the user directory of freva-dev and replace <username> with your k-number or b-number username:
ssh <username>@levante.dkrz.de
#After login to Levante
cd work/ch1187/clint/freva-dev/share/work/<username>/freva-dev/
git clone https://gitlab.dkrz.de/freva/plugins4freva/plugin_workshop/example_plugin.git
In this step you need to install the dependencies. Have a look at the previous section (How To Install All Needed Libraries Of A Plugin)
Plug a tool into Freva
Plug a tool into Freva


Contact: freva@dkrz.de
Plugin Developer Guide: https://freva-clint.github.io/freva/developers_guide.html
Workshop GitLab Repository: https://gitlab.dkrz.de/freva/freva_workshop